Qualys VMDR
Access Levels: Advanced | Enterprise
In Censys Attack Surface Management (ASM), you can connect your host association/dissociation Logbook events with Qualys Vulnerability Management Detection and Response (VMDR) to gain insight into your attack surface and exposures.
After configuring the integration, it will poll Attack Surface Management for new host association and host disassociation events in your ASM Logbook.
- If a host is associated with your attack surface (via a host association event), it is sent to Qualys VMDR and added to your asset folder by default; this is called Censys ASM IPs.
- If a host is disassociated from your attack surface (via a host disassociation event), it is removed from the asset folder.
- Before adding a host to Qualys VMDR, the integration checks whether it already exists. If it does, it is not imported. If it does not exist, it is imported.
Prerequisites
- You must have an active instance of the Qualys Cloud Platform and a subscription or license to Qualys VMDR.
- In Qualys VMDR, you must create an asset group for the ASM IPs.
- We recommend using the name Censys ASM IPs.
Configure the integration in Censys ASM
-
Go to the Censys ASM web console, then click Integrations.
-
Locate Qualys and click Set Up.
-
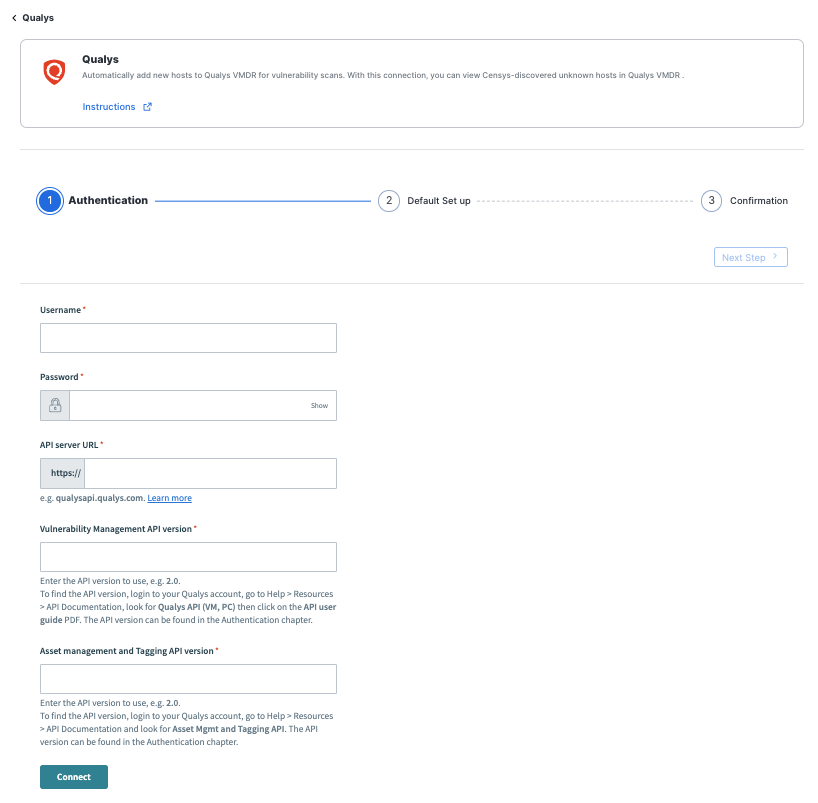
On the Authentication page, configure the following:
- Username: Enter your Qualys username.
- Password: Enter your Qualys password.
- API Server URL: Enter your Qualys API server URL.
- Follow the Qualys documentation to confirm your URL.
- Vulnerability Management API version: Enter the API version to use.
- To find the API version:
- Go to your Qualys account and clickHelp > Resources > API Documentation.
- Search for Qualys API (VM, PC), then click the API user guide PDF.
- Navigate to the Authentication chapter to confirm the API version.
- To find the API version:
- Asset management and Tagging API version: Enter the API version to use.
- To find the API version:
-
Go to your Qualys account and click Help > Resources > API Documentation.
-
Search for Asset Mgmt and Tagging API, then click the API user guide PDF.
-
Navigate to the Authentication chapter to confirm the API version.
-
- To find the API version:
-
Click Connect, then click Next Step.
-
Enter the Asset Group IP for the group you created in Qualys.
-
Click Submit, then click Close.
Modify the integration
- Go to the Censys ASM web console and click Integrations.
- Locate Qualys and click Manage.
- Go through the setup wizard, as described in the section above, and make any necessary changes.
Verify that the assets appear in Qualys
-
Go to Qualys and click Assets > Asset Groups.
-
In the list of groups, find the one you created for the Censys ASM integration. Click next to the IP address for that asset group, then click Info.
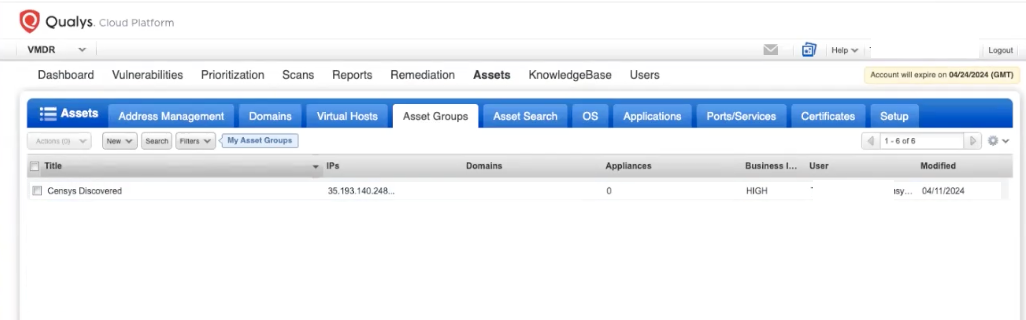
-
Click the tabs to learn more about the assets in the group.