Build, Save, and Automate ASM Queries
You can build queries using Censys Search Language syntax to search across your inventory in Censys Attack Surface Management (ASM). ASM queries can be saved and automated to enable efficient monitoring of your attack surface.
Build queries
ASM uses the same domain-specific language, the Censys Search Language (CSL), as Legacy Search. The documentation page for CSL contains multiple examples of ASM queries formatted using CSL syntax.
The data objects and fields available in Censys ASM are slightly different than those available in Legacy Search. Use the query builder bar in the ASM web console to help identify fields of interest. Refer to Inventory Assets for a list of some of the fields available for each ASM asset type.
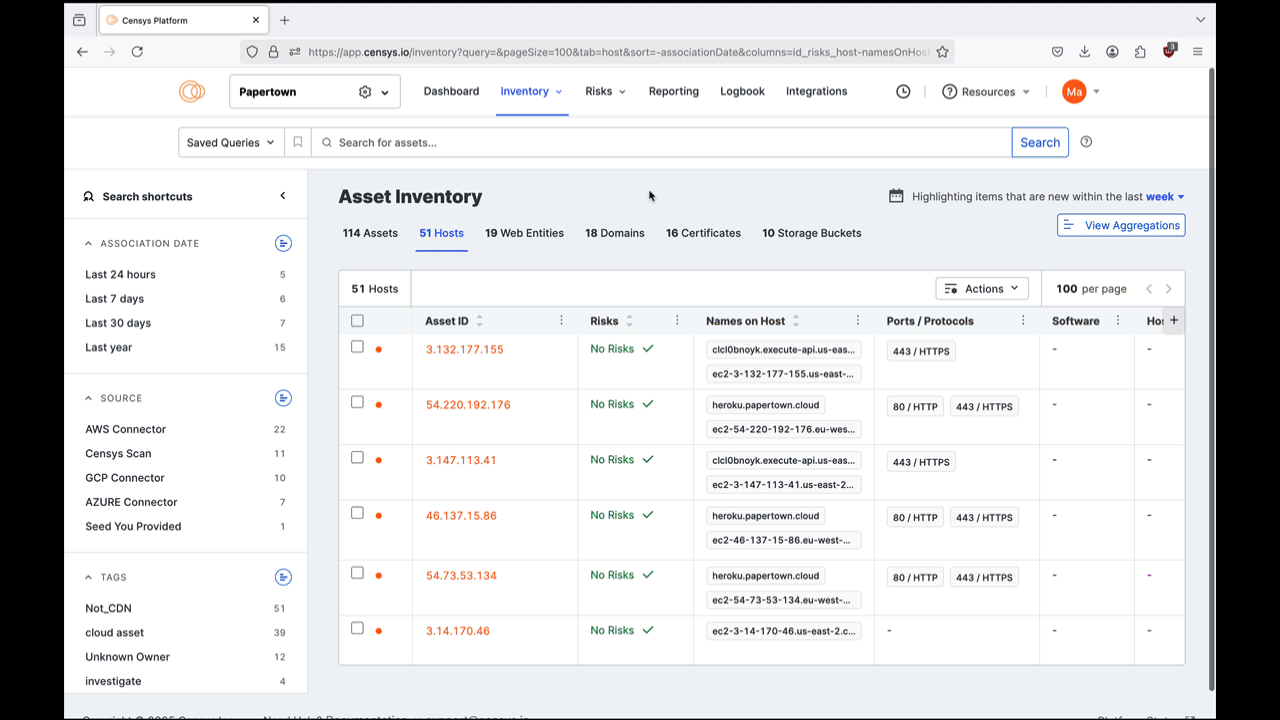
Inventory and search shortcuts
Your Inventory in the ASM web console is a great place to build queries intuitively.
View your Inventory and Search shortcuts
- Log in to the ASM web console and click Inventory > All Inventory.
- Filter your view by selecting one of the asset types at the top of the page.
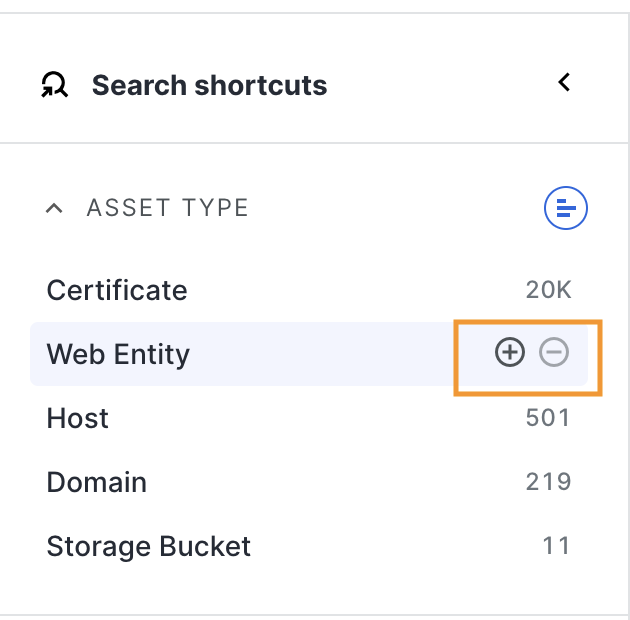
- Note the Search shortcuts panel on the left side of the Asset Inventory page.
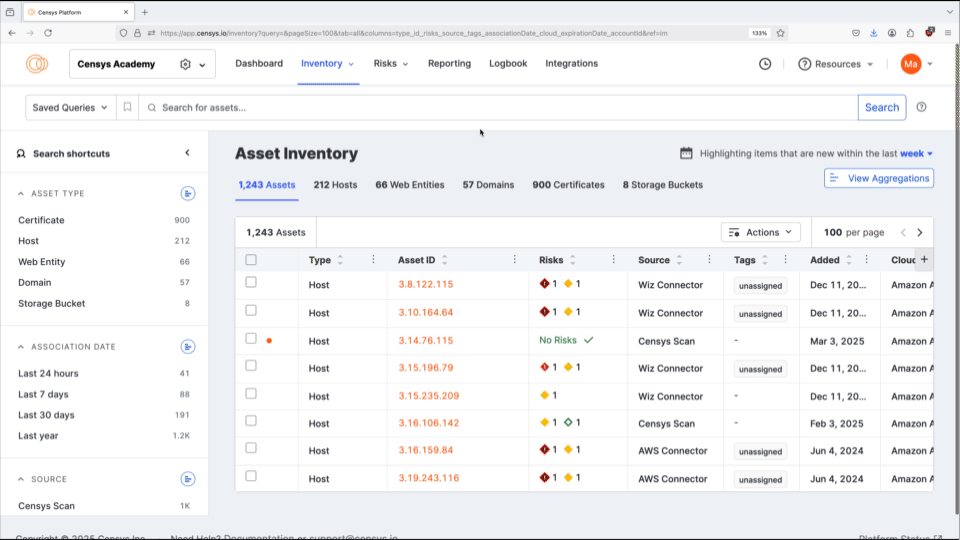
Based on your search results and the selected asset type, the Search shortcuts panel displays the most common field values. These values update dynamically with each new query, ensuring the breakdown reflects the latest data.
This panel Inventory simplifies the query building process by providing quick access to the most relevant asset attributes. It automatically gathers key field values from your search results, letting you refine queries with one click.
Quick search
Click a value in the Search shortcuts panel to add a key-value pair to the search bar. This new criteria is added to any existing query in the search bar.
Add a NOT statement
Hover over a Search shortcut value to reveal an option to negate logic from a query. Click the minus button - to append a NOT statement targeting the applicable field-value pair, removing it from your results.
Friendly formatting
Friendly formatting helps summarize fields with many unique values or where logical grouping makes more sense than showing unique values. On the Search shortcuts panel, fields like association date are grouped into buckets of the last 24 hours, 7 days, 30 days, and year. When you click these values, logic is appended to the query using the range syntax from CSL that encompasses the time window.
Save queries
To save a query:
- In the ASM console, input a query into the search bar.
- Click the bookmark ( ) next to the search bar.
- Enter a name for your query.
- Click Save.
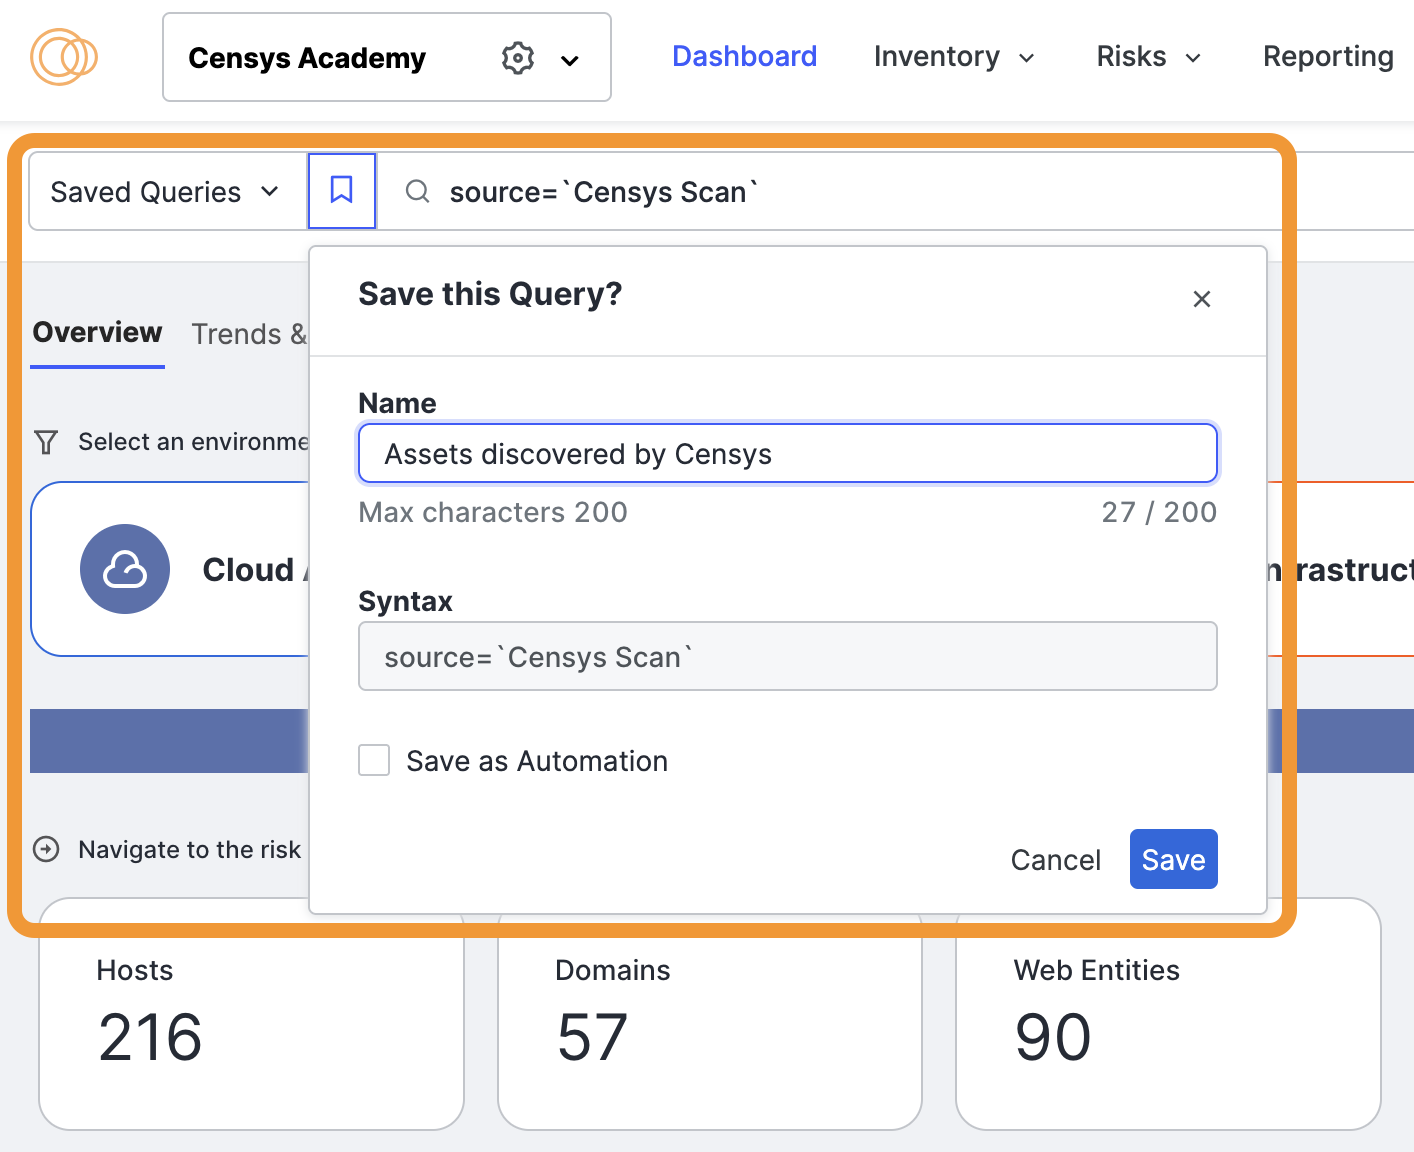
Saved queries can be used by anyone on your team with access to ASM, including through the API.
Run and browse saved queries
- Next to the search bar, click Saved Queries to open the Saved Queries menu to view and manage your team’s saved queries.
- Click a saved query entry to run it immediately.
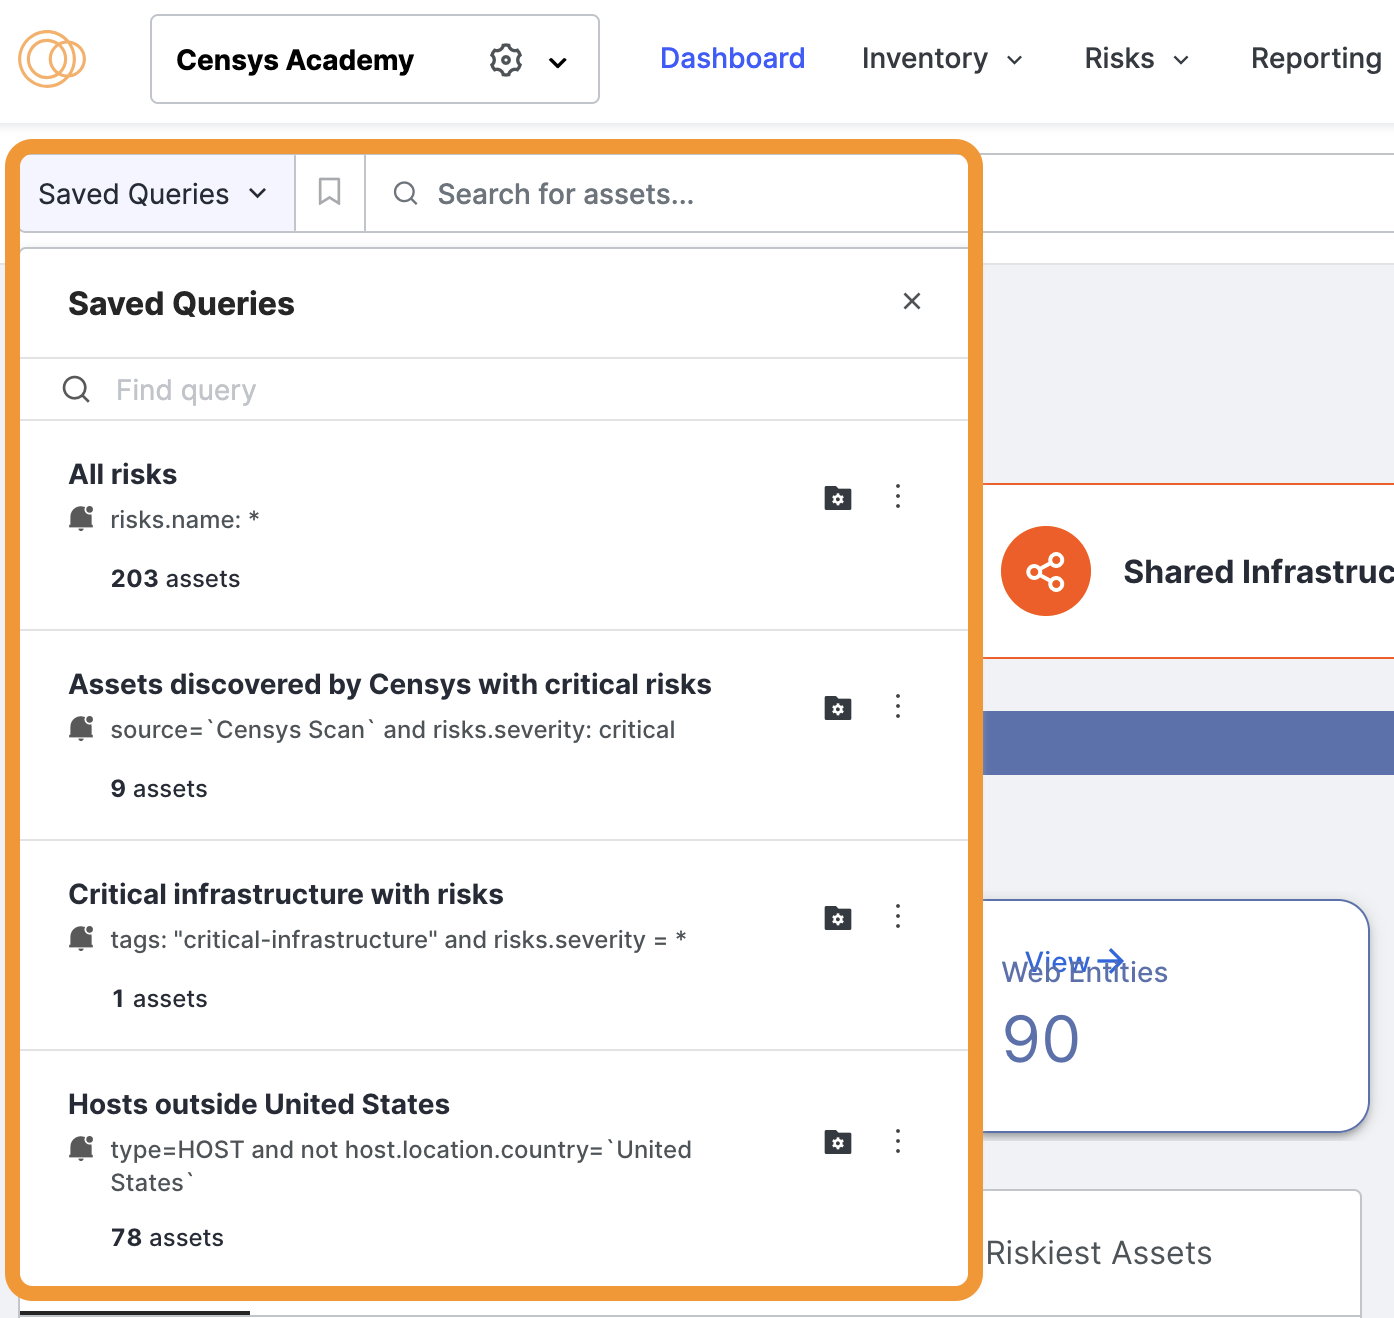
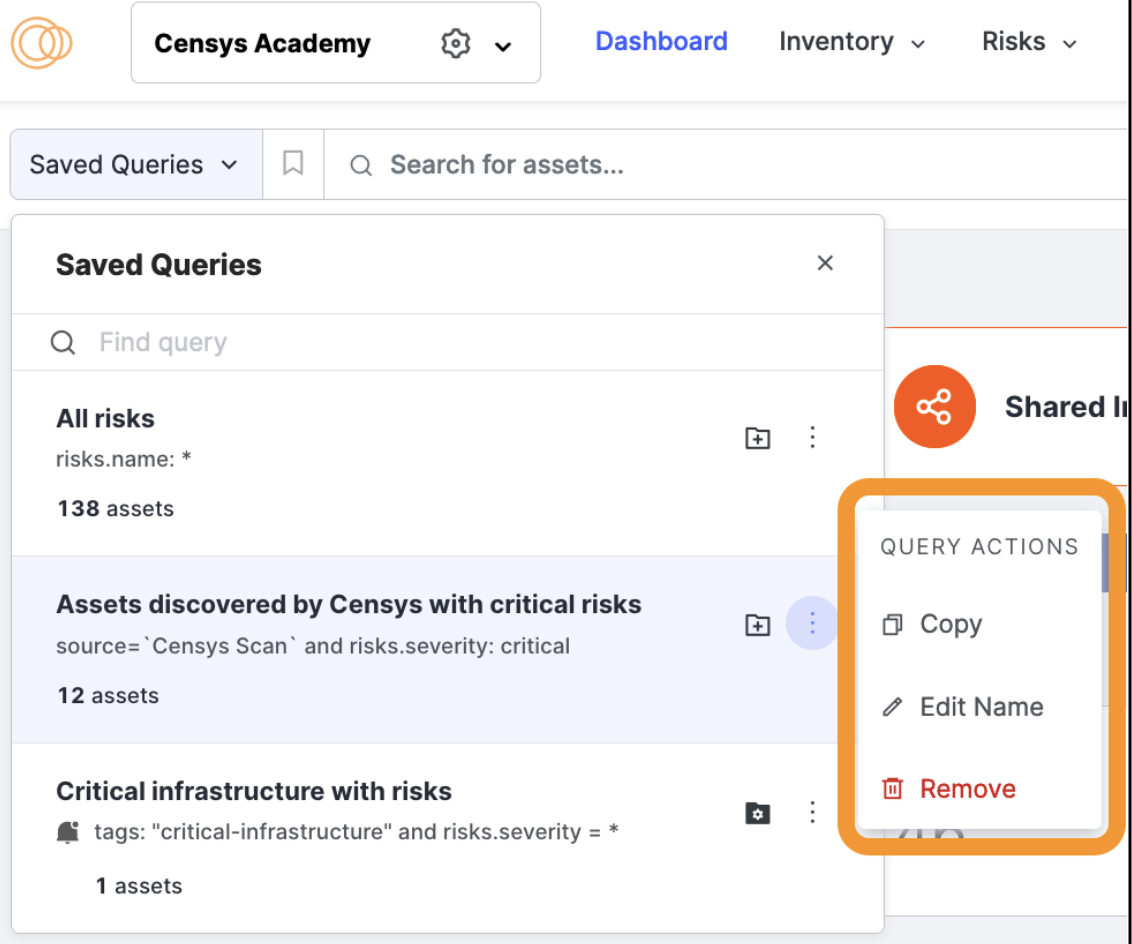
Perform an action on a saved query
- In the Saved Queries menu, next to a Saved Query, click the three-dots ( ) to open the Query Actions menu.
- From this menu, you can copy the query, edit the query name, or remove it.
Automate saved queries
You can automate saved queries to send alerts to destinations of your choice or to add or remove tags from assets returned from the query.
The following video provides an overview of saved query automation in ASM. Detailed instructions are provided below the video.
Save a query as an alert
Email alerts are available to all ASM customers. Slack, Microsoft Teams, and Cisco Webex alerts are only available to ASM Enterprise customers.
You can create alerts whenever a new asset matches or is removed from a saved query, then send notifications to a destination of your choice. When an asset is added or removed from a saved query, an alert notification is sent at the end of the hour.
-
In the Saved Queries menu, click automation ( ) next to a saved query to open the automation setup page.
- You can also set up a newly-created query as an alert directly from the save query menu by checking the Save as Automation box and clicking the Save & Set up Automation button.
-
Select the Alerts tab.
-
In the Alert on: section, select whether you want to send alerts to destinations whenever any new asset is found or whenever an asset is removed. You may select both options.
-
In the Available Integrations section, choose the integrations you want alerts to be sent to.
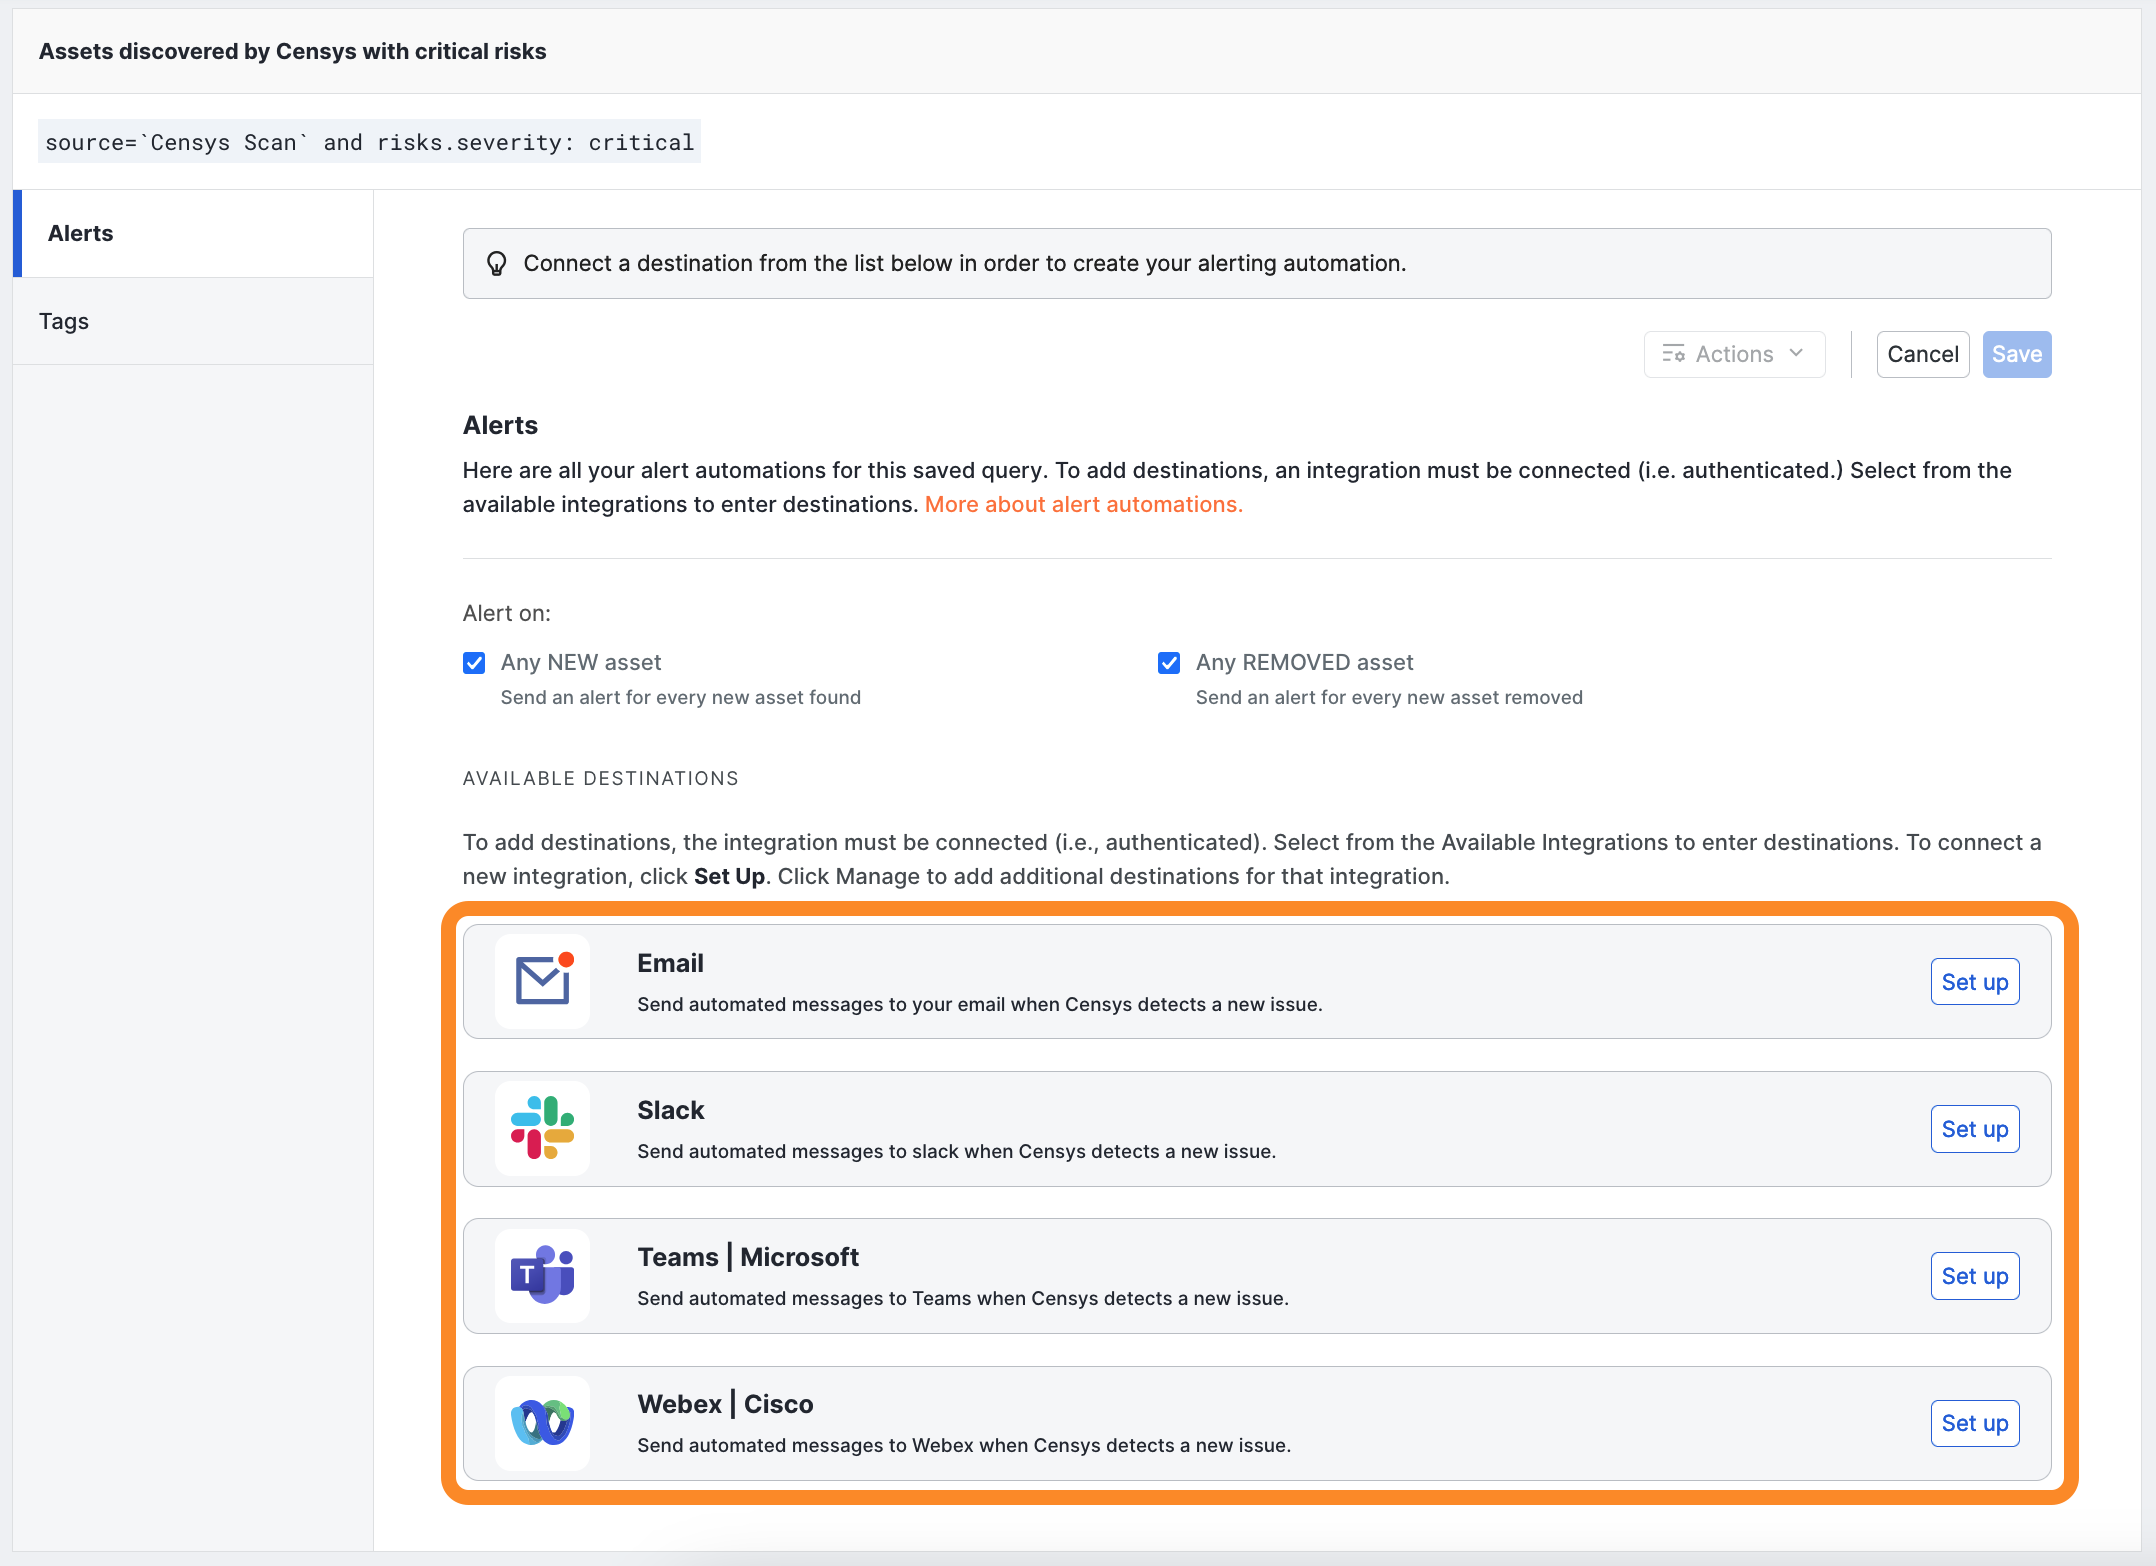
- Email:
- Click Set Up.
- Enter the email address(es) where you wish to receive alert notifications.
- Click Submit.
- Slack:
- Click Set Up.
- Enter the channel ID(s) where you wish to receive alert notifications.
- Click Submit.
- Microsoft Teams:
- Click Set Up.
- Configure the Auth type.
- Auth type: Select Application or OAuth 2.0.
- If you choose Application, enter your Tenant ID.
- If you choose OAuth 2.0, select your API scope(s).
- Auth type: Select Application or OAuth 2.0.
- Do not modify the Custom OAuth profile setting.
- Click Submit.
- Cisco Webex:
- Click Set Up.
- Enter the Space name where you wish to receive alert notifications.
- Click Submit.
- In the upper-right corner, click Save to save your alert configuration.
When the criteria you configure have been met, you will receive a notification that includes any assets added or removed. The notification also includes a downloadable CSV file containing data associated with the alert.
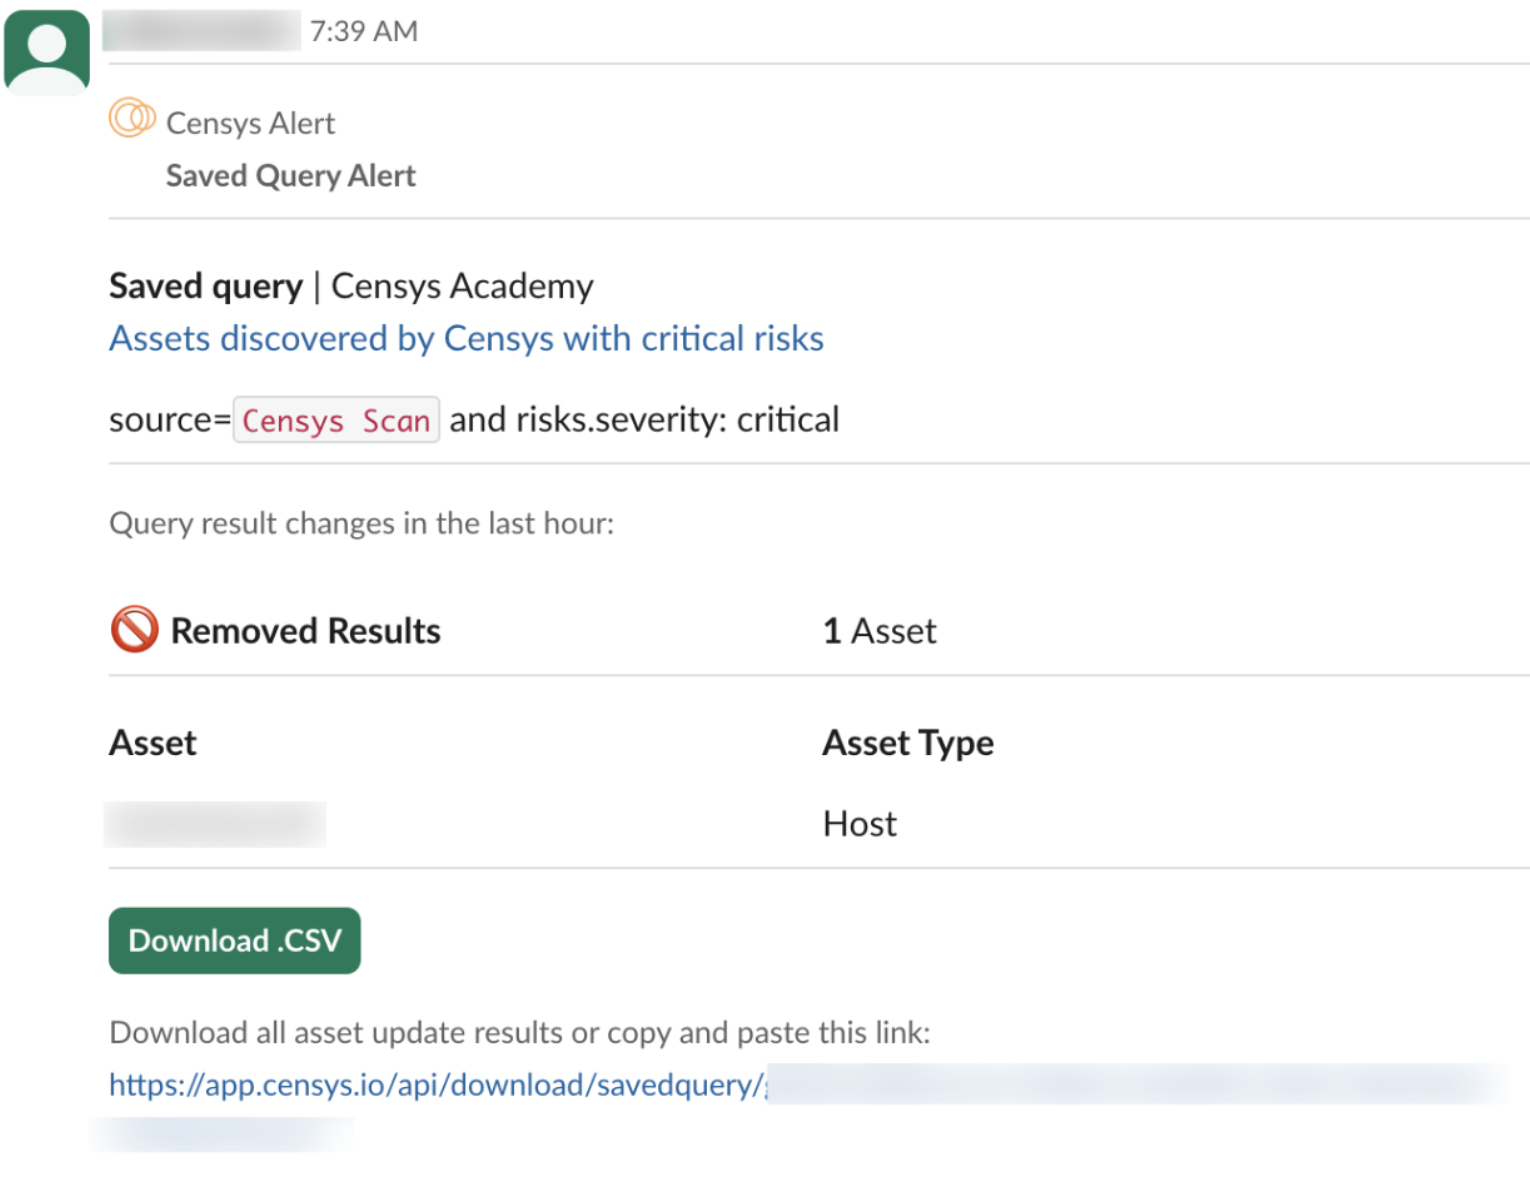
An example alert delivered to Slack.
To remove all alerts for a saved query, click the Actions menu at the top right corner of the Alerts tab and select Remove all destinations.
Automatically tag assets returned by a saved query
Auto-tagging is available to ASM Enterprise customers.
Save time and accelerate research and remediation by automating manual workflows with auto-tagging. Whenever an asset matches a saved query, that asset is tagged. When an asset no longer matches the saved query, the asset can be untagged.
Auto-tagging checks for new or removed assets every hour, based on when the automation was created. For example, if the automation was saved at 1:15, the next update will be at 2:15.
Changes to the saved query can be triggered by a number of different actions, both automated and manual:
- The attack surface refresh will result in the highest volume of changes every 24 hours.
- Cloud connector ingestion will result in changes every 4 hours.
- Manual actions, such as adding a tag or a risk rescan, can result in changes that will be captured every hour.
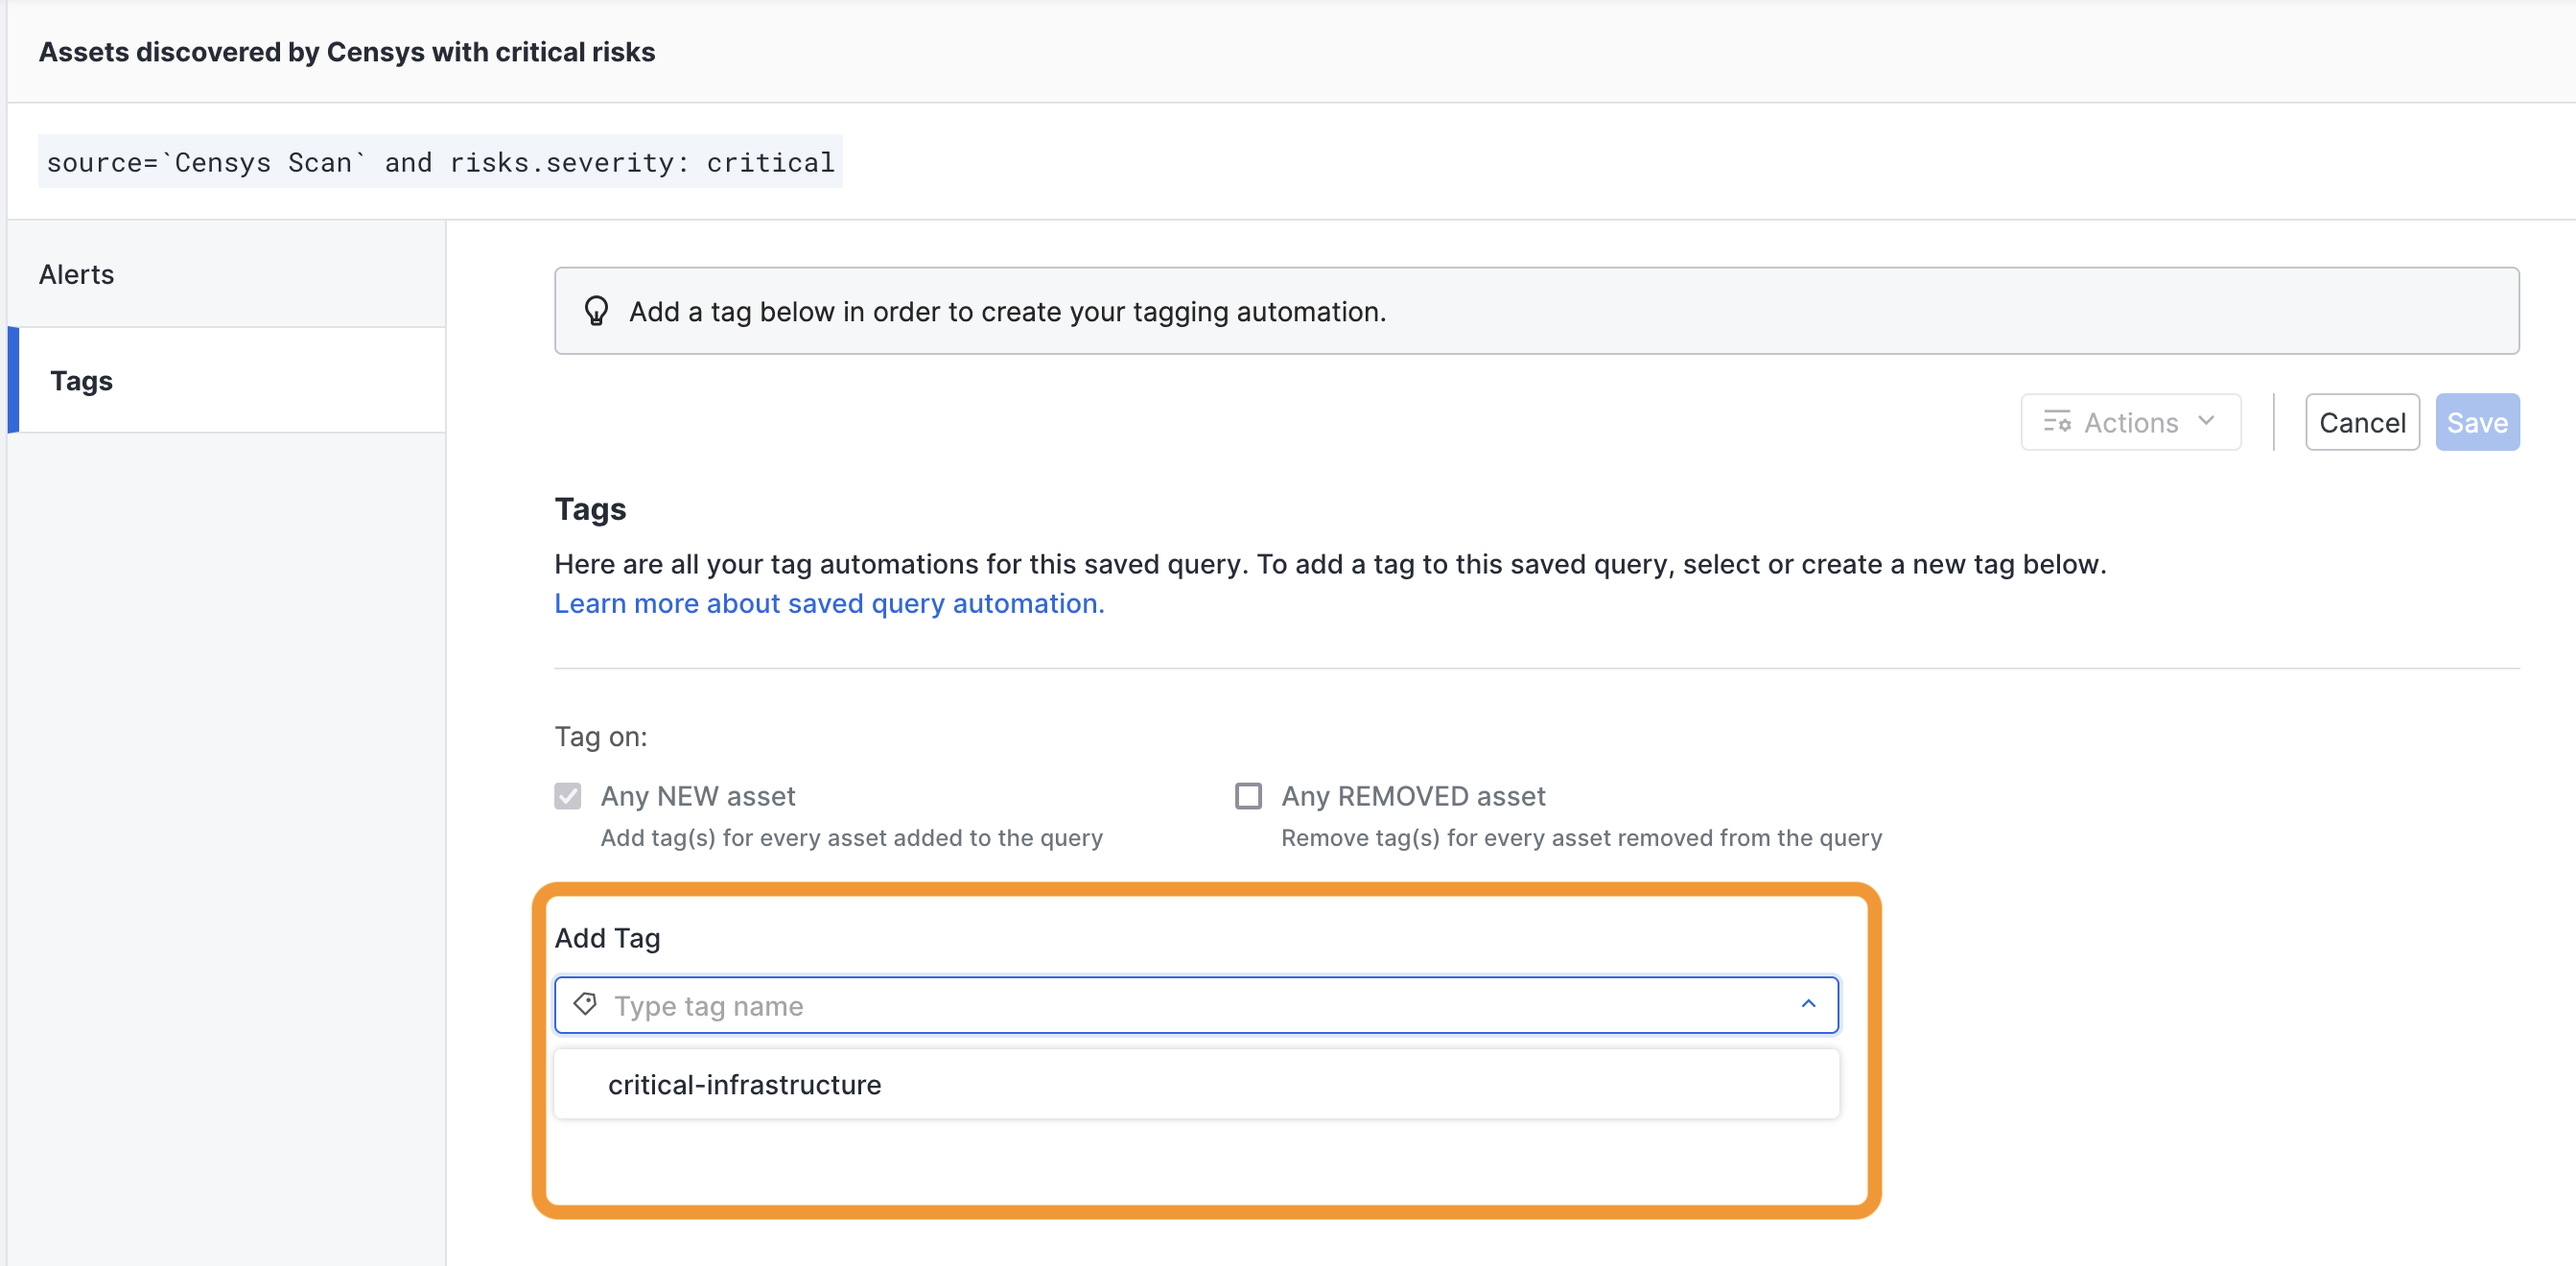
Set up auto-tagging
-
Open the automation menu for a saved query and select the Tags tab.
-
In the Tag on: section, check the box for Any REMOVED asset if you want to remove a tag from every asset that no longer matches your selected query. Note that Any NEW asset cannot be deselected.
-
In the Add Tag section, select the tag to add or remove from assets matched by the query.
- You can edit a selected tag by clicking the pencil icon ( ) or remove it by clicking the trash can icon ( ).
- The first time that auto-tagging runs after setup, all inventory assets returned by the query will be assigned the tag you selected.
- If you select Any REMOVED asset in your configuration options, when auto-tagging runs, any assets that are not returned by your saved query and are assigned the selected tag will have the tag removed.
-
In the upper-right corner, click Save to save your tagging configuration.
To remove all tagging configurations, click the Actions menu in the top right corner of the Tags tab and select Remove all tags.
Example automation use cases
Alert on or tag assets based on location
Set up an alert or tag to be informed about or track assets that meet the geographic criteria you specify. For example, if you only wish to operate using assets located within the United States, you could set up an alert or auto-tagging workflow to be alerted or tag assets that are identified outside of the United States using the following query.
type=HOST and not host.location.country='United States'
Alert or tag assets based on discovery source and risk severity
Set up an alert for this query or a similar one to be informed whenever assets that were discovered by Censys scans are added to or removed from your inventory. You could also use this query with auto-tagging to add an “assigned: [team member name]” tag for follow-up investigation.
source='Censys Scan'and risks.severity: critical
Tag assets to filter out of downstream integrations
Set up auto-tagging for this query or a similar one to add a tag (like exclude_from_snow) that you can exclude from downstream ASM integrations like ServiceNow VR. For example, you might want to exclude host or web entity assets associated with CDNs from downstream export to ServiceNow.
web_entity.instances.cdns: * or host.cdns: *