The Censys Platform API provides programmatic access to the data available in the Censys Platform. The Platform API is organized around RESTful principles and follows a predictable, resource-oriented URL structure, supports application/JSON request bodies, returns JSON-encoded responses, and adheres to standard HTTP methods, authentication, and response codes.
API access is governed by the Censys Terms of Service and all scripted access should use this API. Your API rate limits are shown on the Censys Platform Personal Access Tokens page.
API endpoint and data access
All registered users have access to the Platform API in general, but the endpoints you can use varies based on your plan.
- Censys Free users only have access to host, web property, and certificate lookup (get a host, retrieve multiple hosts, get a certificate, retrieve multiple certificates, get a web property, and retrieve multiple web properties) endpoints.
- Censys Starter users have access to all Global Data and Collections endpoints except the Live Rescan endpoint.
- Censys Core and Censys Search users have access to all Global Data and Collections endpoints.
- Censys Core users with access to the Adversary Investigation module have access to all Global Data, Collections, and Adversary Investigation endpoints.
- Censys Starter, Censys Search, and Censys Core users need the API Access role (see below) to use the API for their organization.
API calls consume credits. For more information about API credit consumption, see Censys Credits.
API usage aligns with the data access capacity of your tier. For example, the Starter tier can view seven days of host history while the Search and Core tiers can view at least 31 days of history. For more information, see Feature and Data Access Tiers.
Transition from Legacy Search API
To ensure a smooth transition from the Legacy Search API to the Platform API, please note the following:
- Base URL: There is a new base URL for the Censys Platform API.
- Access token: There is a new process to generate a Personal Access Token.
- Review any downstream applications that receive data from the API.
- See SDK section below. These differ from the Legacy Search SDKs.
SDKs
The following Platform SDKs are available:
Additionally, Censys maintains a CLI tool for the Platform.
API setup and usage
Follow the steps below to begin using the Censys API.
Step 1: API Access role for Starter, Search, and Core users
In order to use the API as a member of an organization on a Starter, Search, or Core plan, you must be assigned the API Access role. To learn more about roles, see Role-Based Access Control.
Free users do not need to have the API Access Role in order to use the API.
Step 2: Create a Personal Access Token
The Censys Platform API uses Personal Access Tokens to authenticate requests. Users can generate multiple PATs as needed.
-
In the Censys Platform web console, click your user icon in the top right corner. In the pop-up menu, select API Access.
-
Click Create New Token.
-
Name your PAT in the Token Name field (required) and add a description (optional).
-
Click Create.
-
A confirmation dialog appears when the token is successfully created. Click Copy to clipboard and store your token in a secure location for future use. The token value is found at the bottom of the dialog.
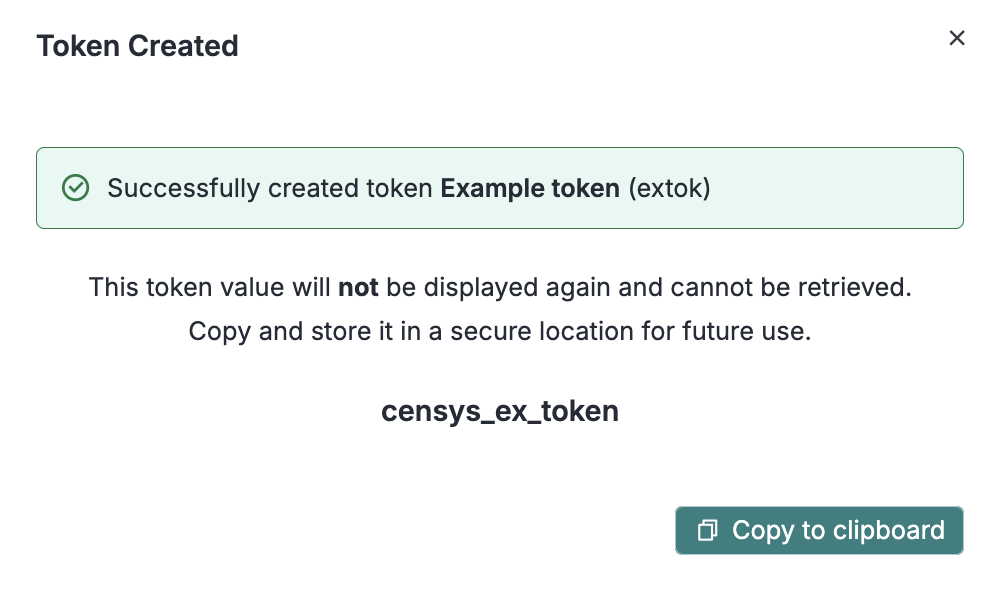
WarningYour Personal Access Tokens grant significant access, so keep them secure. Never expose API keys in public areas like GitHub or client-side code.
Delete a Personal Access Token
Follow the steps below to delete a token:
- Go to My Account > Personal Access Tokens tab.
- Locate the token that you want to delete.
- Click the trash can icon on the token card.
Step 3: Find and use your organization ID (optional)
The Censys Platform API identifies the entitlements and billing details for your request based on the organization ID included in your call.
Censys Starter users and Censys Search and Censys Core organizations have an organization ID. Free users do not have an organization ID.
If you do not include an organization ID in your API requests, then it will attempt to execute the request using the permissions associated with your Free account.
To obtain your organization ID:
-
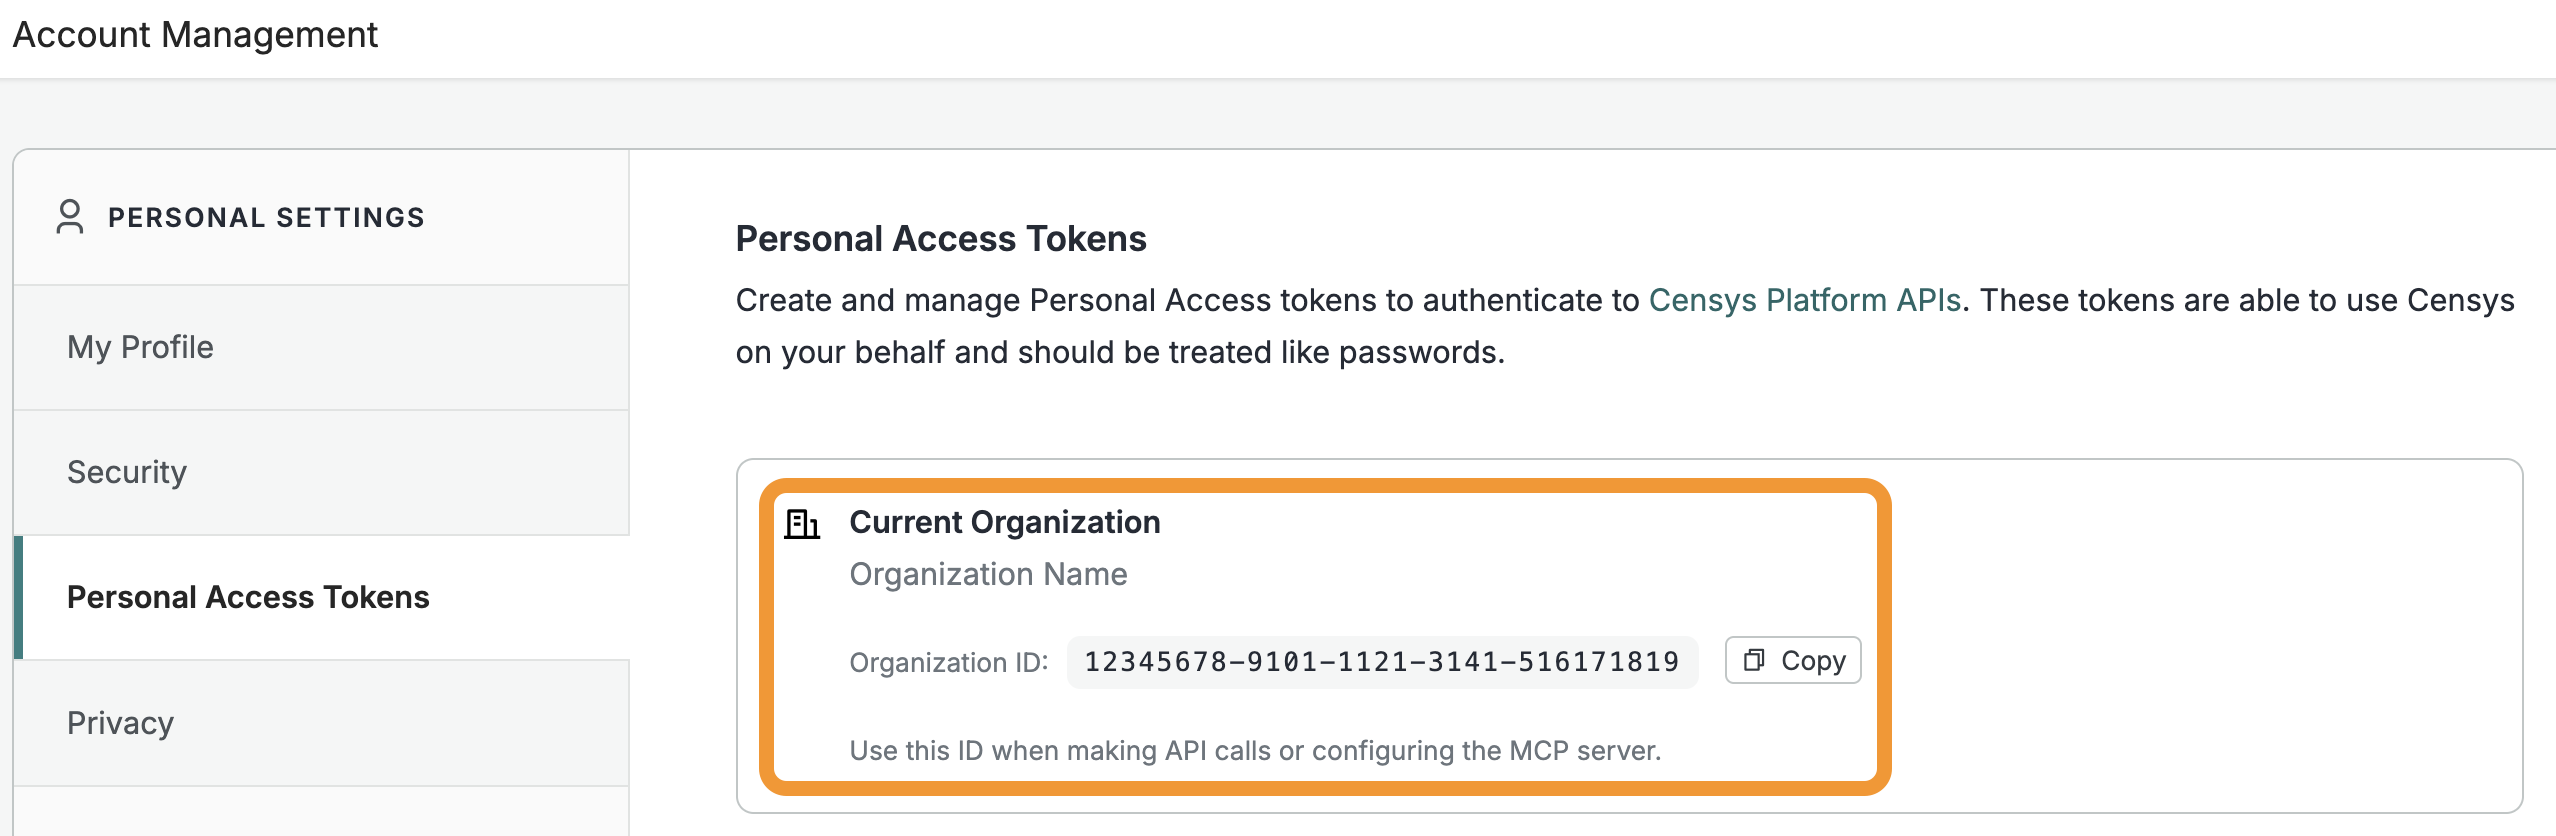
Open the Platform web console and ensure that your organization account is selected. Go to the Personal Access Tokens page.
-
The ID for your organization is shown in the "Current Organization" box. Click Copy to copy it to your clipboard.
NoteThe organization ID can be set via query parameter or header. If values are provided for both, the query parameter takes precedence.
Header
After you identify your organization ID, you can include it in the header or as a query parameter.
--header 'X-Organization-ID: 12345678-91011-1213'Query Parameter
organization_id=12345678-91011-1213Step 4: Understand headers
You can include the following headers when making requests to the Censys Platform API.
Personal Access Token (PAT) (required)
You must include a valid PAT to make API requests. Use the format below to set your PAT in the header.
--header 'Authorization: Bearer censys_ex_token'Organization ID (optional)
You can set your organization ID in the header or in the query parameters. Use the format below to set your organization ID as a header.
--header 'X-Organization-ID: 12345678-91011-1213'Accept (optional)
The Accept header uses a vendor-specific content type, which specifies both the desired response format (JSON) and the version of the asset schema (host, certificate, web property) the client expects to receive. This allows users to explicitly request a compatible schema version, even as the API and data models evolve over time.
If you don't include this header, your call will return the most recent schema version. Currently, there is one schema version available.
Format
Use the format below to create a valid Accept header.
application/vnd.censys.api.{api_version}.{asset_type}.{asset_version}+jsonThis example above requests the following:
- API version: v3
- Asset type: host
- Schema version: v1
- Format: json
The example below is the Accept header for the get a host endpoint.
Accept: application/vnd.censys.api.v3.host.v1+jsonStep 5: Make API calls
You can make API calls using your tool of choice or the Try It feature on API endpoint documentation pages. Note that calls made using the Try It feature on the documentation will deduct from your credit balance.
Example cURL API call
The example cURL request below is for the get a host endpoint. This call includes the organization ID as a query parameter.
curl --request GET \
     --url 'https://api.platform.censys.io/v3/global/asset/host/47.33.210.14?organization_id=12345678-91011-1213' \
     --header 'Accept: application/vnd.censys.api.v3.host.v1+json' \
     --header 'Authorization: Bearer censys_ex_token'
The cURL request below includes the organization ID in the header.
curl --request GET \
     --url 'https://api.platform.censys.io/v3/global/asset/host/47.33.210.14' \
     --header 'X-Organization-ID: 12345678-91011-1213' \
     --header 'Accept: application/vnd.censys.api.v3.host.v1+json' \
     --header 'Authorization: Bearer censys_ex_token'
Example response
Click the header below to view an example response.
Example Response
  {
  "result": {
    "resource": {
      "ip": "27.33.219.14",
      "location": {
        "continent": "North America",
        "country": "United States",
        "country_code": "US",
        "city": "Mount Pleasant",
        "postal_code": "48858",
        "timezone": "America/Detroit",
        "province": "Michigan",
        "coordinates": {
          "latitude": 43.59781,
          "longitude": -84.76751
        }
      },
      "autonomous_system": {
        "asn": 20115,
        "description": "ACME-20115",
        "bgp_prefix": "47.33.192.0/19",
        "name": "ACME-20115",
        "country_code": "US"
      },
      "whois": {
        "network": {
          "handle": "AC04",
          "name": "Acme",
          "cidrs": [
            "47.32.0.0/12",
            "47.48.0.0/14"
          ],
          "created": "2014-12-23T00:00:00Z",
          "updated": "2014-12-23T00:00:00Z",
          "allocation_type": "ALLOCATION"
        },
        "organization": {
          "handle": "CC04",
          "name": "Acme",
          "street": "6175 S. Willow Dr",
          "city": "Greenwood Village",
          "state": "CO",
          "postal_code": "80111",
          "country": "US",
          "abuse_contacts": [
            {
              "handle": "ABUSE19-ARIN",
              "name": "Abuse",
              "email": "[email protected]"
            }
          ],
          "admin_contacts": [
            {
              "handle": "IPADD1-VRIN",
              "name": "IPAddressing",
              "email": "[email protected]"
            }
          ],
          "tech_contacts": [
            {
              "handle": "IPADD1-VRIN",
              "name": "IPAddressing",
              "email": "[email protected]"
            }
          ]
        }
      },
      "services": [
        {
          "port": 7547,
          "protocol": "CWMP",
          "transport_protocol": "tcp",
          "ip": "47.24.210.14",
          "scan_time": "2025-03-06T19:03:55Z",
          "banner_hash_sha256": "e3b0c44298fc1c149afbf4c8996fb92427ae41e4649b934ca495991b7852b855",
          "cwmp": {
            "auth": [
              "Digest realm=\"Sagemcom TR-069\", qop=\"auth,auth-int\", nonce=<REDACTED>, opaque=\"ddb504c1\""
            ],
            "server": "gSOAP/2.7"
          }
        }
      ],
      "service_count": 1,
      "dns": {
        "reverse_dns": {
          "resolve_time": "2025-02-13T14:02:41Z",
          "names": [
            "syn-047-033-210-014.res.acme.com"
          ]
        },
        "names": [
          "syn-047-033-210-014.res.spectrum.com"
        ],
        "forward_dns": {
          "syn-047-033-210-014.res.acme.com": {
            "resolve_time": "2025-02-27T20:21:52Z",
            "name": "syn-047-033-210-014.res.acme.com",
            "record_type": "a"
          }
        }
      }
    },
    "extensions": {}
  }
  }
Step 6: Handle HTTP response codes
| Error Code | Description | Resolution |
|---|---|---|
| 200 | OK - Your call was successful. | Success |
| 401 | Your request doesn't contain a valid Authorization token. | Verify whether you used the correct PAT or generate a new PAT. |
| 403 | User does not have permission to access this data. | Ask your admin to grant you API Access Role. Verify that your user tier offers the data requested. |
| 404 | Not Found | Insufficient permissions for the resource; it could be a resource from a different org, etc. |
| 422 | Unprocessable Entity | Misconfigured or incorrect value. Some examples: incompatible search filters, malformed query string, invalid pagination parameters etc. |
| 422 | Missing Organization ID | Enter a valid organization ID as a query parameter or in the header. |
| 500 | Internal Server | General issue, try again later. |
Next steps
API rate limits
Rate limits are associated with your account tier.
| Tier | Concurrent Actions |
|---|---|
| Censys Free | 1 concurrent action |
| Censys Starter | 1 concurrent action |
| Censys Search and Censys Core | 25 concurrent actions |
Base URLs
Base URLs for Platform API endpoints are as follows.
| API Set | Base URL |
|---|---|
| Global Data | |
| Adversary Investigation | |
| Collections | |
| Account Management | |